4日10日 OFweek 2025(第十四届)中国机器人产业大会
立即报名 >>>
7.30-8.1 全数会2025(第六届)机器人及智能工厂展
火热报名中>>
一篇文章带你了解CSS3圆角知识
一、浏览器支持
表中的数字指定完全支持该属性的第一个浏览器版本。
数字后面的 -webkit- 或者 -moz- 使用时需要指定前缀。
属性ChromeFirefoxSafariOperaIEborder-radius5.0 4.0 -webkit-9.04.0 3.0 -moz-5.0 3.1 -webkit-10.5
二、border-radius 属性
1. 创建具有背景图的圆角
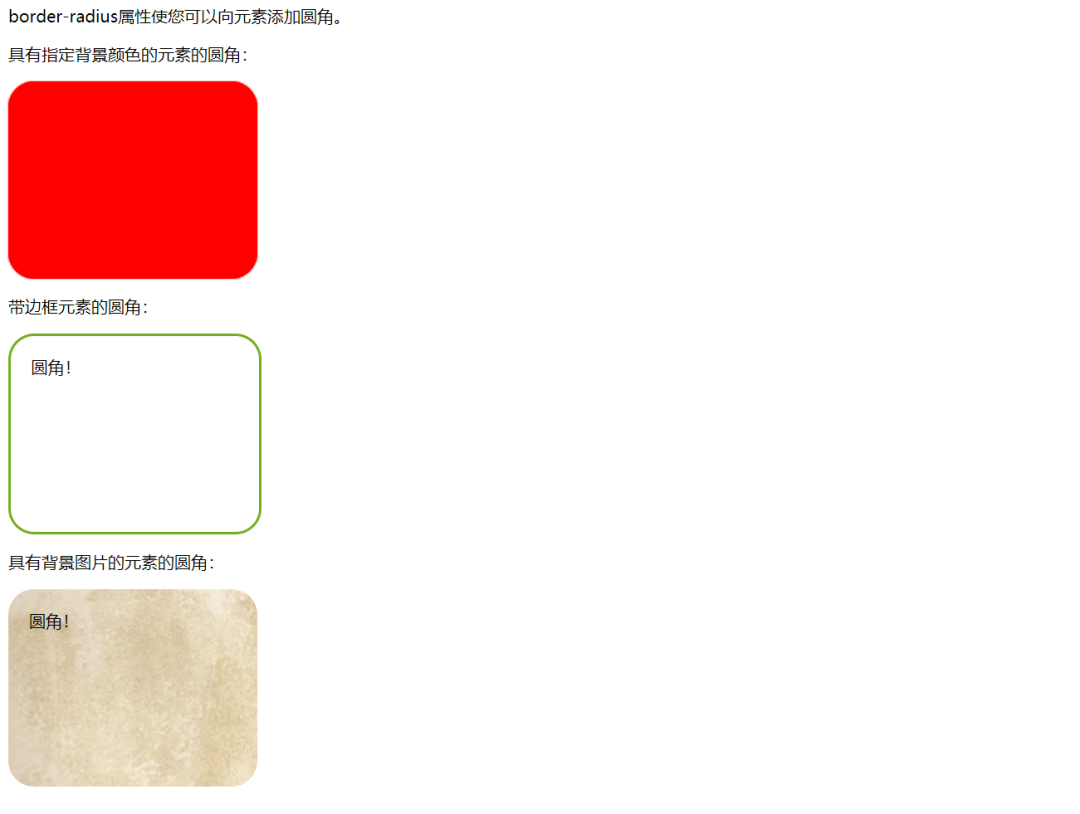
CSS3中,可以使用border-radius属性,为元素指定圆角显示。
代码如下:
<!DOCTYPE html> <html> <meta charset="UTF-8"> <title>项目</title>
<head> <style> #rcorners1 { border-radius: 25px; background: #f00; padding: 20px; width: 200px; height: 150px; }
#rcorners2 { border-radius: 25px; border: 2px solid #73AD21; padding: 20px; width: 200px; height: 150px; }
#rcorners3 { border-radius: 25px; background: url(img/fy_indexBg.jpg); background-position: left top; background-repeat: repeat; padding: 20px; width: 200px; height: 150px; }</style> </head>
<body>
<p>The border-radius property allows you to add rounded corners to elements.</p> <p>Rounded corners for an element with a specified background color:</p> <!--1.具有指定背景色的圆角元素--> <p id="rcorners1">Rounded corners!</p> <p>Rounded corners for an element with a border:</p> <!--2.带边框的圆角元素:--> <p id="rcorners2">Rounded corners!</p> <!--3.带背景图的圆角元素--> <p>Rounded corners for an element with a background image:</p> <p id="rcorners3">Rounded corners!</p>
</body>
</html>
提示:
border-radius属性实际是border-top-left-radius, border-top-right-radius, border-bottom-right-radius 和 border-bottom-left-radius 属性的简写。
2. 为每个角指定弧度
如果只为border-radius属性指定一个值,则此半径将应用于所有4个角。
另外可以根据自己开发的需求,分别指定每个角。以下是规则:
四个值: 第一个值适用于左上角,第二个值适用于右上方,第三值应用于右下角,第四值适用于左下角。
三个值: 第一个值适用于左上,二值适用于右上和左下,右下第三值适用于。
两个值: 第一个值适用于左上和右下角,和二值适用于右上和左下角。
一个值: 所有的四个角都是圆的。
实例1:
1.四个值 - border-radius: 15px 50px 30px 5px
#rcorners4 { border-radius: 15px 50px 30px 5px; background: #f00; padding: 20px; width: 200px; height: 150px;}

2.三个值 - border-radius: 15px 50px 30px
#rcorners5 { border-radius: 15px 50px 30px; background: #f00; padding: 20px; width: 200px; height: 150px;}

3.两个值 - border-radius: 15px 50px
#rcorners6 { border-radius: 15px 50px; background: #f00; padding: 20px; width: 200px; height: 150px;}

完整代码 :
<!DOCTYPE html><html lang="en"><head> <meta charset="UTF-8"> <title>项目</title> <style> #rcorners4 { border-radius: 15px 50px 30px 5px; background: #f00; padding: 20px; width: 200px; height: 150px; }
#rcorners5 { border-radius: 15px 50px 30px; background: #f00; padding: 20px; width: 200px; height: 150px; }
#rcorners6 { border-radius: 15px 50px; background: #f00; padding: 20px; width: 200px; height: 150px; }</style></head><body>
<p>四个值 - border-radius: 15px 50px 30px 5px:</p><p id="rcorners4"></p>
<p>三个值 - border-radius: 15px 50px 30px:</p><p id="rcorners5"></p>
<p>两个值 - border-radius: 15px 50px:</p><p id="rcorners6"></p>
</body></html> 实例2:
创建椭圆形的圆角
创建椭圆形的圆角
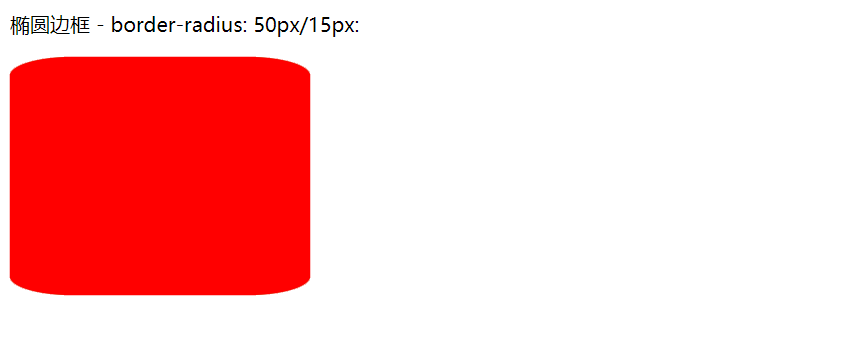
椭圆边框 :border-radius: 50px/15px
#rcorners7 { border-radius: 50px/15px; background: #73AD21; padding: 20px; width: 200px; height: 150px;}
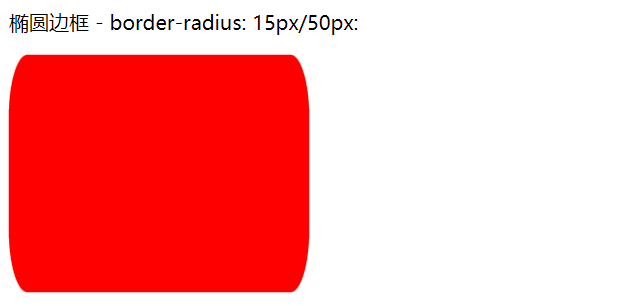
椭圆边框 : border-radius: 15px/50px
#rcorners8 { border-radius: 15px/50px; background: #73AD21; padding: 20px; width: 200px; height: 150px; }
椭圆边框 : border-radius: 50%
#rcorners9 { border-radius: 50%; background: #73AD21; padding: 20px; width: 200px; height: 150px; }
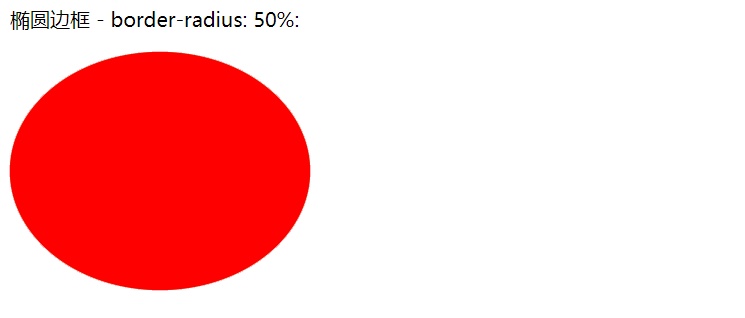
完整代码:
<!DOCTYPE html><html lang="en"><head> <meta charset="UTF-8"> <title>项目</title> <style> #rcorners7 { border-radius: 50px/15px; background: #73AD21; padding: 20px; width: 200px; height: 150px; }
#rcorners8 { border-radius: 15px/50px; background: #73AD21; padding: 20px; width: 200px; height: 150px; }
#rcorners9 { border-radius: 50%; background: #73AD21; padding: 20px; width: 200px; height: 150px; }</style></head><body>
<p>椭圆边框 - border-radius: 50px/15px:</p> <p id="rcorners7"></p>
<p>椭圆边框 - border-radius: 15px/50px:</p> <p id="rcorners8"></p>
<p>椭圆边框 - border-radius: 50%:</p> <p id="rcorners9"></p>-->
</body></html>
三、总结
1、本文主要讲解了CSS3圆角,通过一些属性的演示,丰富的案例,帮助大家理解CSS知识。希望大家可以耐心的去学习,同时希望碰到问题主动搜索,尝试一下,总会有解决方法。
2、代码很简单,希望能帮到你。

图片新闻
技术文库
最新活动更多
-
即日-3.27立即报名>> 【在线直播】解密行业检测流量密码——电子与半导体行业
-
3月27日立即报名>> 【工程师系列】汽车电子技术在线大会
-
即日-3.28立即报名>>> 【在线会议】汽车检测的最佳选择看这里
-
即日-3.31立即报名>>> 【在线会议】AI加速卡中村田元器件产品的技术创新探讨
-
4月1日立即下载>> 【村田汽车】汽车E/E架构革新中,新智能座舱挑战的解决方案
-
4日10日立即报名>> OFweek 2025(第十四届)中国机器人产业大会
推荐专题


 分享
分享



发表评论
请输入评论内容...
请输入评论/评论长度6~500个字
暂无评论
暂无评论